Controlling your iModel in Unreal
Introduction
This tutorial looks at the various blueprint functions in the iTwin Unreal Datasmith Plugin you can use to manipulate your iModel in Unreal and builds a simple user interface with a scrubber for users to interact with your schedule animation in real-time. It also focuses on synchronizing the level sequence (used by actors with transform animations) with the ScheduledActor’s animations, which is necessary when you exported using the combine meshes option.
Prerequisites
This tutorial assumes that you have:
- Installed Unreal Engine 4.26.1 or later
- In your project already imported Datasmith content that was made with the iTwin Exporter for Datasmith from an iTwin that contains a schedule script. You may follow one of the tutorials below for help exporting your own data.
- An existing Unreal Engine project with the iTwin Unreal Datasmith Plugin installed.
- Depending on your Unreal Engine version, this may require Visual Studio to be installed. The prerequisites section of Exporting iModel to Unreal Datasmith as a combined mesh has instructions for recompiling the plugin.
- A reasonable knowledge of blueprint scripting in Unreal Engine
1. Preparing actors in your scene
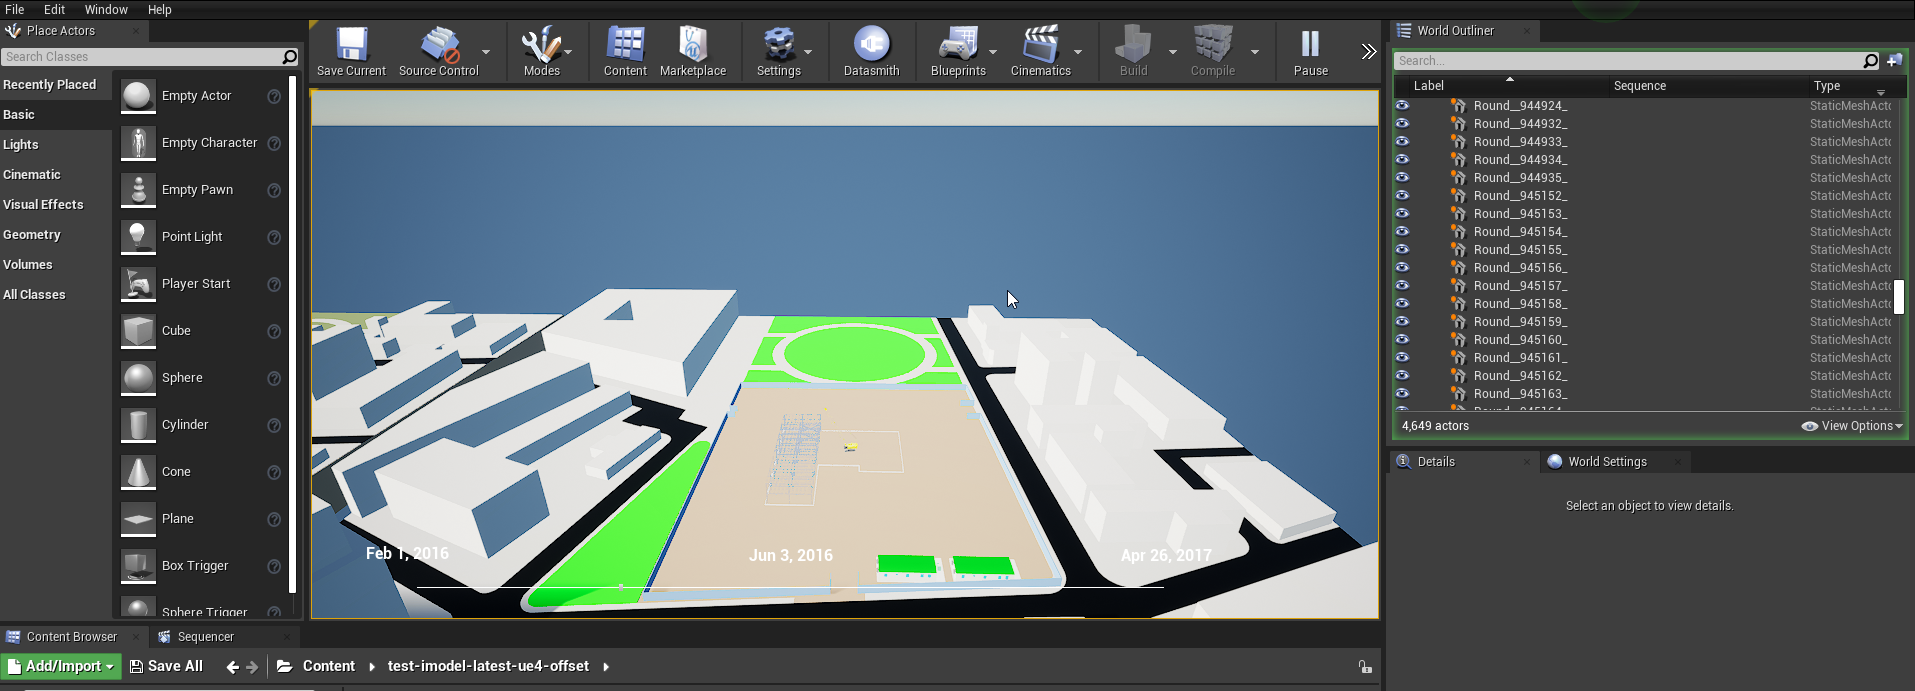
In the level editor where you see your imported data, you need to add some tags to specific actors so later code can find them easily. From the World Outliner at the top right of the editor, select the datasmith scene actor that was created when you imported your Datasmith content. Then in the Details panel, search for or scroll down to the Actor > Tags section and press the plus button to add a new tag, give it a value of “ExampleDatasmithScene1”.
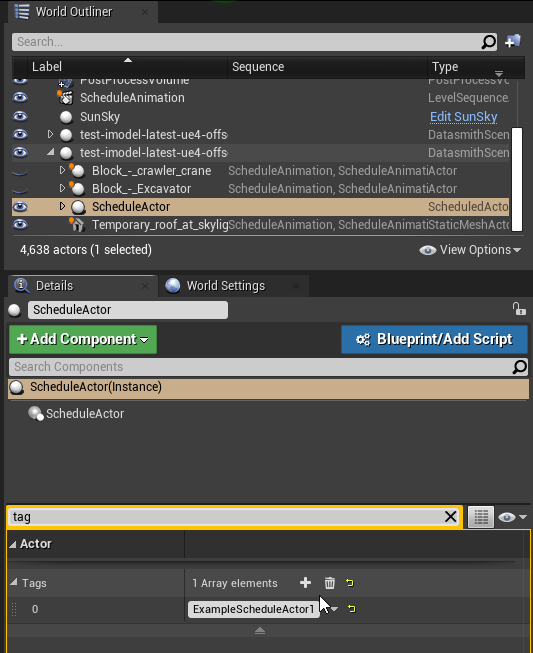
If you selected the combine meshes option while exporting, you will have an actor named ScheduleActor as a child of your datasmith scene actor, Select it and give it a new tag with a value of “ExampleScheduleActor1”. It is not necessary to have done a combined-mesh export, however this tutorial will assume you have and write the code to synchronize the exported level sequence with the ScheduleActor driving animations in the combined mesh.
If you have not done so already, in the Content Browser, in the folder where you chose to import your datasmith content, go into the animations subfolder and drag-and-drop the ScheduleAnimation asset into the level to add the actor to the scene.
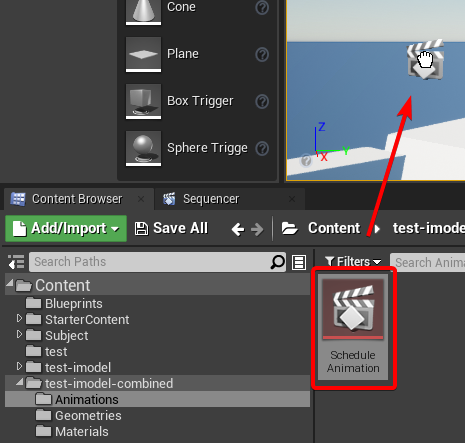
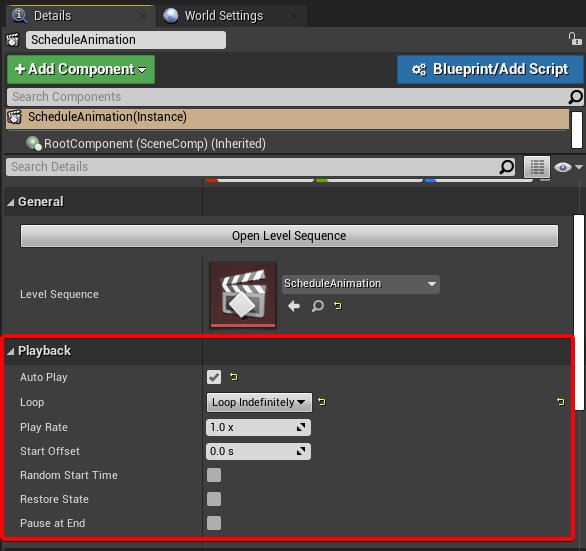
Make sure the new level sequence actor is selected, and in the Details Panel, give it an actor tag with a value of “ScheduleLevelSequence1”. Still in the Details Panel, find the Playback settings section, check Auto Play and set the Loop option to Loop Indefinitely.
Using actor tags is one of several ways to make it easy to access actors in the level at runtime in our code. Now that you have them setup, you can use them in the code of the classes that will comprise your user interface.
2. Setting up our interface classes
In Unreal Engine, HUD (Heads Up Display) classes are used to draw the 2-dimensional interface overlaying the rendered scene.
The HUD is controlled by the PlayerController it is attached to, and both are provisioned by the engine’s active GameMode.
In this tutorial a basic gamemode setup will be created so when you run your project, the interface will have a scrubber timeline, some
displayed information about the scene, and inputs to control the schedule animation playback.
Start by pressing the Add/Import button in the Content Browser, and under User Interface pick Widget Blueprint to create a new
Widget Blueprint. Name it ExampleTimelineWidget.
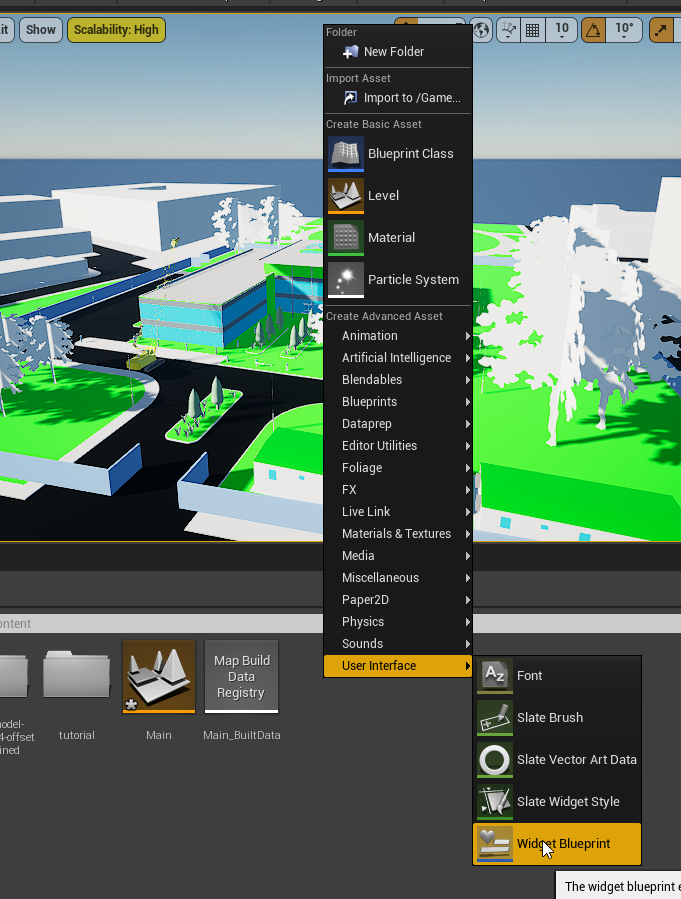
Next, create a new GameModeBase blueprint by pressing the Add/Import button in the Content Browser again,
this time choosing Blueprint Class at the top, under create Create Basic Asset. In the Pick Parent Class dialog, use the search menu to
find the GameModeBase class. Some, but not all, classes may also be selected from the Common Classes list at the top of the dialog.
Name your new GameModeBase subclass ExampleGameModeBase. In the same way create a new PlayerController blueprint, ExamplePlayerController,
and a new HUD blueprint, ExampleHUD, as well. Double-click the newly created ExampleHUD asset in the content editor to open the blueprint editor.
In your HUD’s blueprint event graph, add a Create Widget node to the Begin Play event and call the Add to Viewport function on the created widget reference.
Set the class parameter of the Create Widget node to the blueprint widget class you created, ExampleTimelineWidget.
The resulting node graph for the Begin Play event should look as follows.
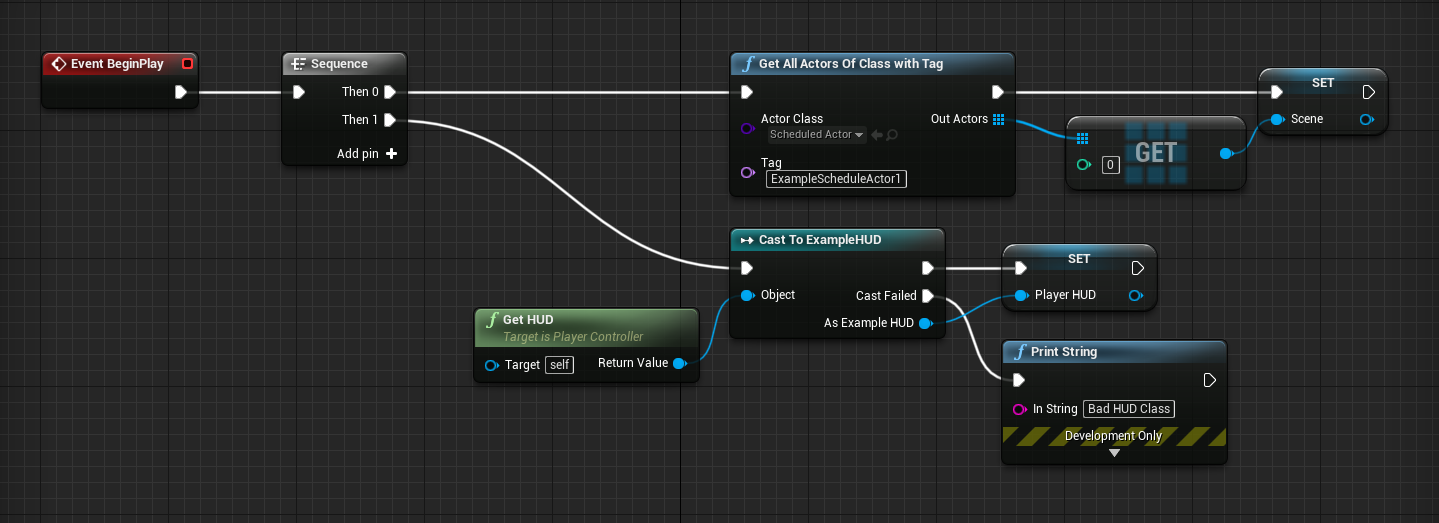
Go back to the Content Browser in the main level editor window and open the ExamplePlayerController class. In the Begin Play event,
add a Get All Actors Of Class with Tag node and get all Scheduled Actors with the tag you added earlier, “ExampleScheduleActor1”. Get the
element at index 0 (the first) element of the array, since we know we have one such actor in the scene, and set it as the value for a new
variable, Scene. You can drag the output pin of the array indexing Get node, and release in the graph space to open the context menu
and at the top select Promote to variable to do this quickly.
Then add a Get HUD node and a Cast to ExampleHUD node after the intialization of Scene. Store the ExampleHUD instance in a new variable, PlayerHUD.
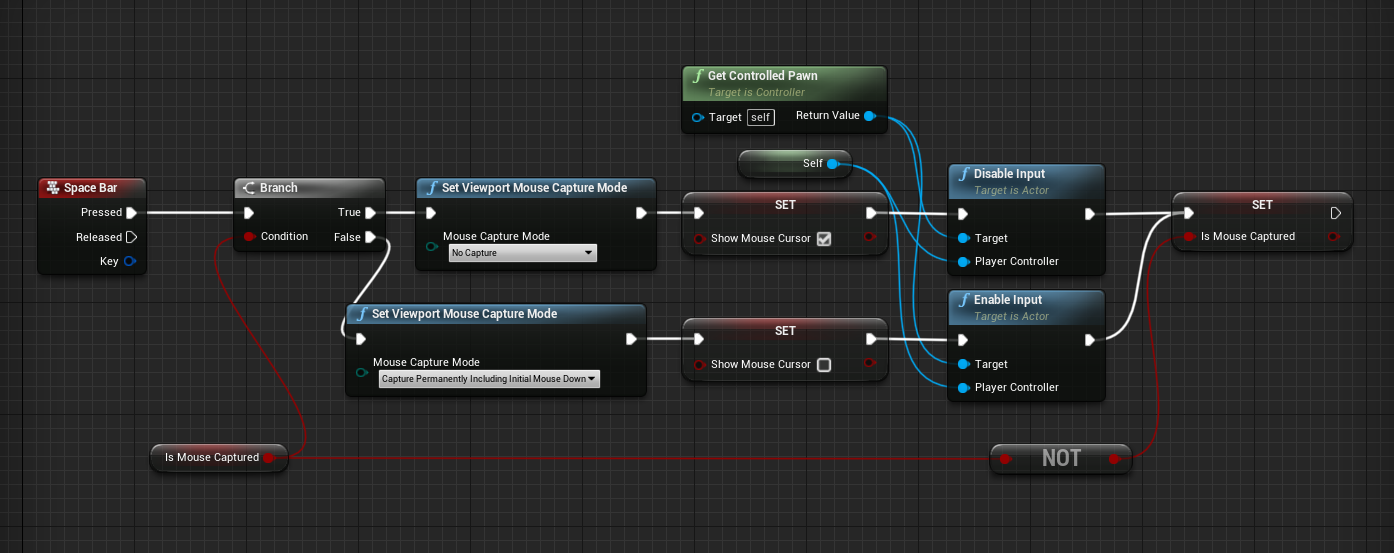
Create a new boolean variable IsMouseCaptured, and right-click in the event graph, search in the context menu for “spacebar” to add the
space bar input event. Then add the following blueprint code to use spacebar to toggle between controlling our spectator pawn or the mouse.
Finally, set your world to use these new blueprint classes, so that when the level is played, your widget is
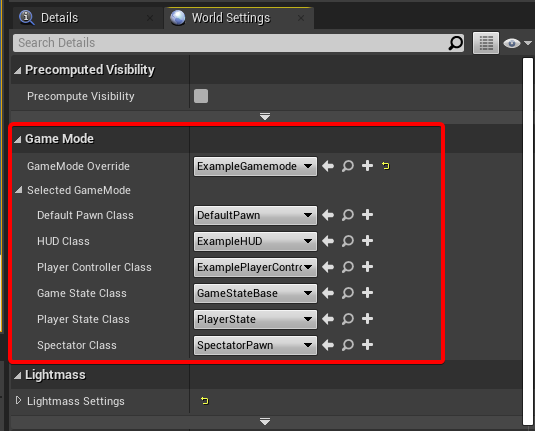
in the viewport. Click the Settings icon in the top bar, and click World Settings in its dropdown. In the World Settings panel,
find the Game Mode section. There, see the GameMode Override dropdown value to your newly created ExampleGameModeBase.
Then expand the Selected GameMode options by clicking the arrow to the left of the label, and set the HUD and PlayerController classes to the ones you created.
Now that HUD and widget spawn when play begins, you need to add some controls to your widget to be able to see it, and then you will be able to hook up those controls to your iTwin’s animation.
3. Laying out the HUD
In the Content Browser, double-click the ExampleTimelineWidget asset you created to open the widget editor. From the Palette on the left,
drag and drop a Slider control into the widget designer viewport. Make sure it is selected, and use the scale handles to scale it across the bottom
edge of the viewport to use as our scrubber. Additionally, place a Text control at each the left and right end of the slider, and one more above the middle
of the slider. You will show your iTwin’s schedule start, end, and current time of the animation in these text controls, updating the current time every tick.
In the Hierarchy panel on the left of the editor, rename your newly placed controls respectively to, Scrubber, StartTime, EndTime, and CurrentTime, and in the top-right corner of the Details panel make sure the Is Variable checkbox is checked so you can reference your controls in the event graph.
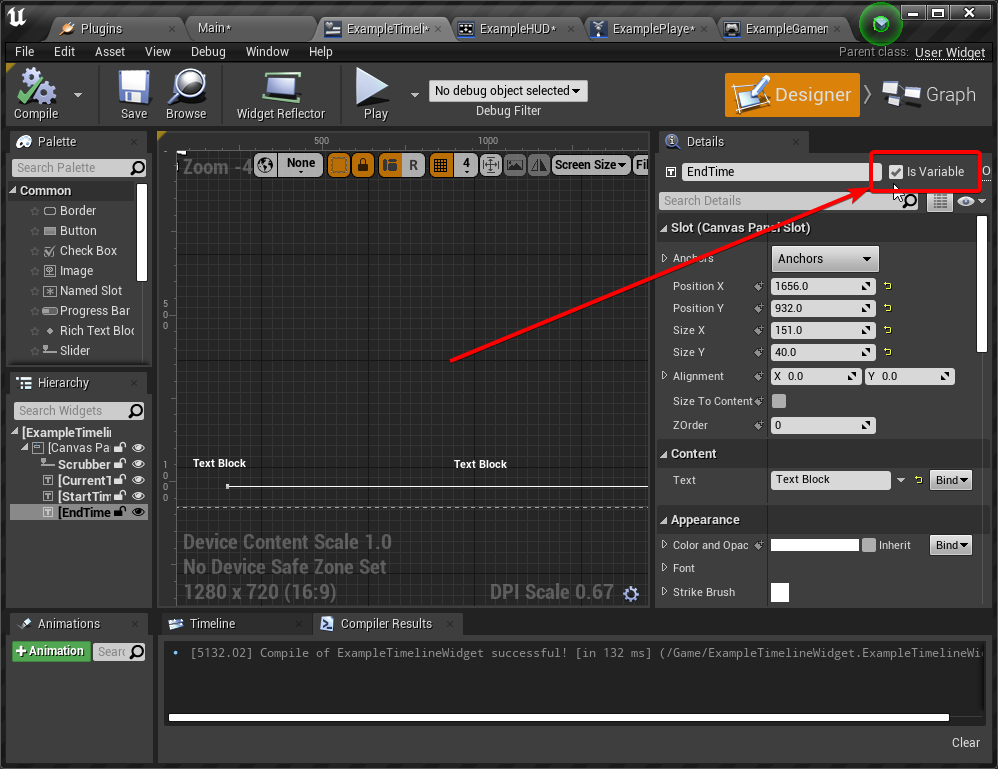
To start scripting your placed controls, switch to the blueprint graph by pressing the Graph button in the top right of the window in the blueprint widget editor.
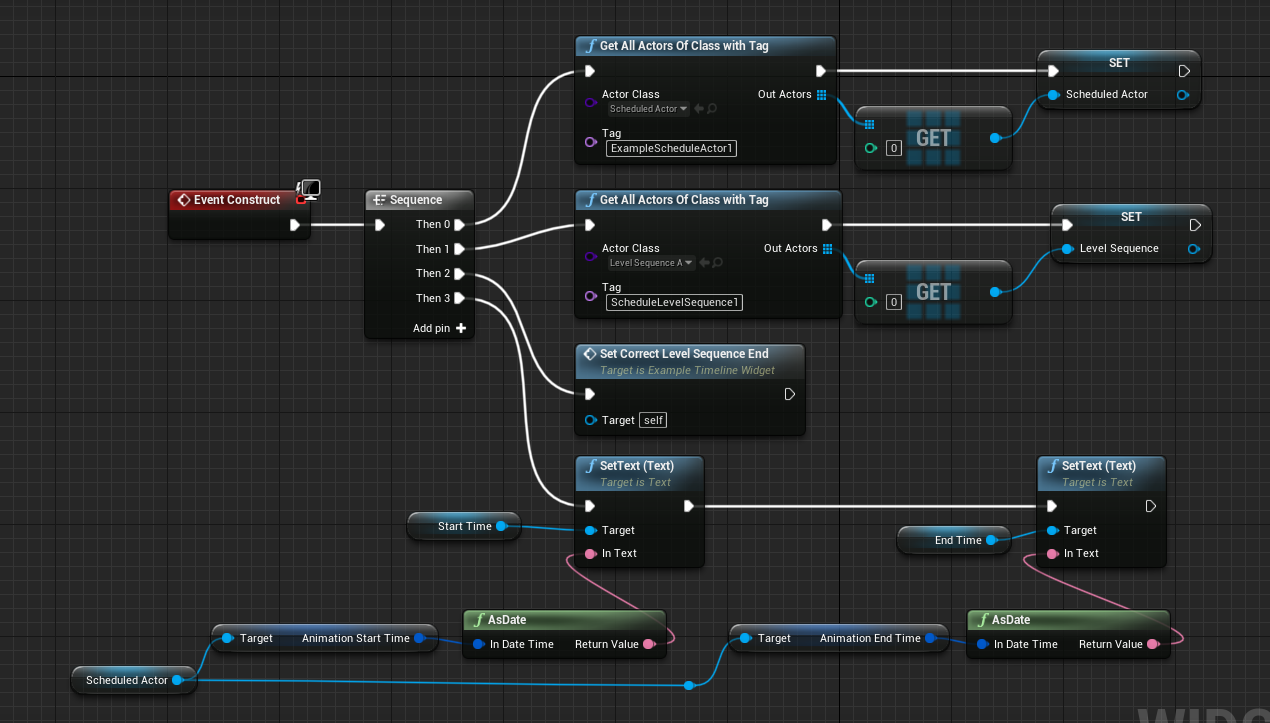
On the widget’s Construct event, first store both the “ExampleScheduleActor1”, and the “ScheduleLevelSequence1” tagged actors stored to variables in your script.
Then call the StartTime text control’s Set Text function and set it to the formatted date text of the ScheduledActor’s AnimationStartTime. Do the same
for EndTime but with the ScheduledActor’s AnimationEndTime.
Then add a custom event to the event graph by right-clicking in the graph and search for Add Custom Event in the context menu. Name this event "Set Correct Level Sequence End", and invoke the event after the variables are initialized in the Construct event that you have been building up.
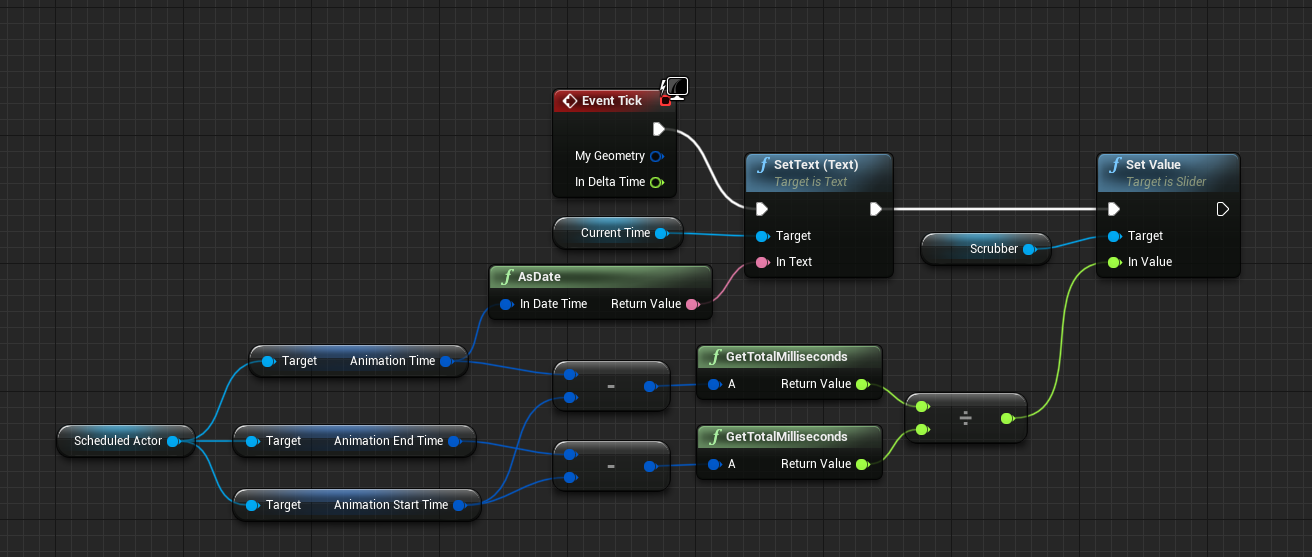
Before you implement that custom event, in the tick event update the CurrentText control with the current time of the ScheduleActor. If you did not combine meshes during export,
you can instead use the static plugin blueprint function GetScheduleDateTimeFromActiveSequence
to get the current date given the level sequence actor. Then, after having set the text, calculate the proportion of the animation played and update Scrubber’s value to match, so that it moves along
with the animation every tick.
Now you should implement the custom event, SetCorrectLevelSequenceEnd. This step is necessary to synchronize the exported level sequence with the ScheduledActor,
because the DatasmithSDK does not currently have a way to set the end frame of a level sequence. When an export is created with the combine meshes option, only
transform data is put in the level sequence, therefore the true end frame which is typically a non-transform frame (i.e. visibility, color, etc, frame) is lost.
To compensate for this, you can calculate the end frame manually from the metadata, and set the correct end time at startup. You could also set the end of the level sequence
asset itself, but a one-time computation at startup is not expensive and does not need to be recalculated in the event of a re-export of your Datasmith content.
To calculate it, divide the schedule date range using the AnimationTicksPerSecondScale variable to find how many 24FPS frames occur during the equivalent game time, which
can then be used to set the level sequence end frame from. In this example int64 is used in order to have the same resolution as DateTime which is internally a single int64.
Additionally, some constants from Unreal’s native ETimespan enumeration are reproduced to calculate the amount of ticks from the amount of seconds using only available blueprint nodes.
Now, when you hit the Play button to watch the scene unfold, your animations should play and loop, with the scrubber moving and the date text updating throughout. You should also be able to press the spacebar to get control of the mouse in order to move the scrubber. Moving the scrubber however, won’t do anything. That is your next step.
4. Scripting the scrubber
Go back to the widget designer by hitting the Designer button at the top-right of the widget blueprint graph. Select your scrubber control in the Hierarchy tab, and in the Details tab scroll all the way to the bottom to the Events section. Click the green plus On Mouse Capture Begin, On Mouse Capture End, and On Value Changed buttons to add those events. Each time you press one of the buttons, you will be taken to where the event was added in the graph, go back to the designer each time until all three events have been added.
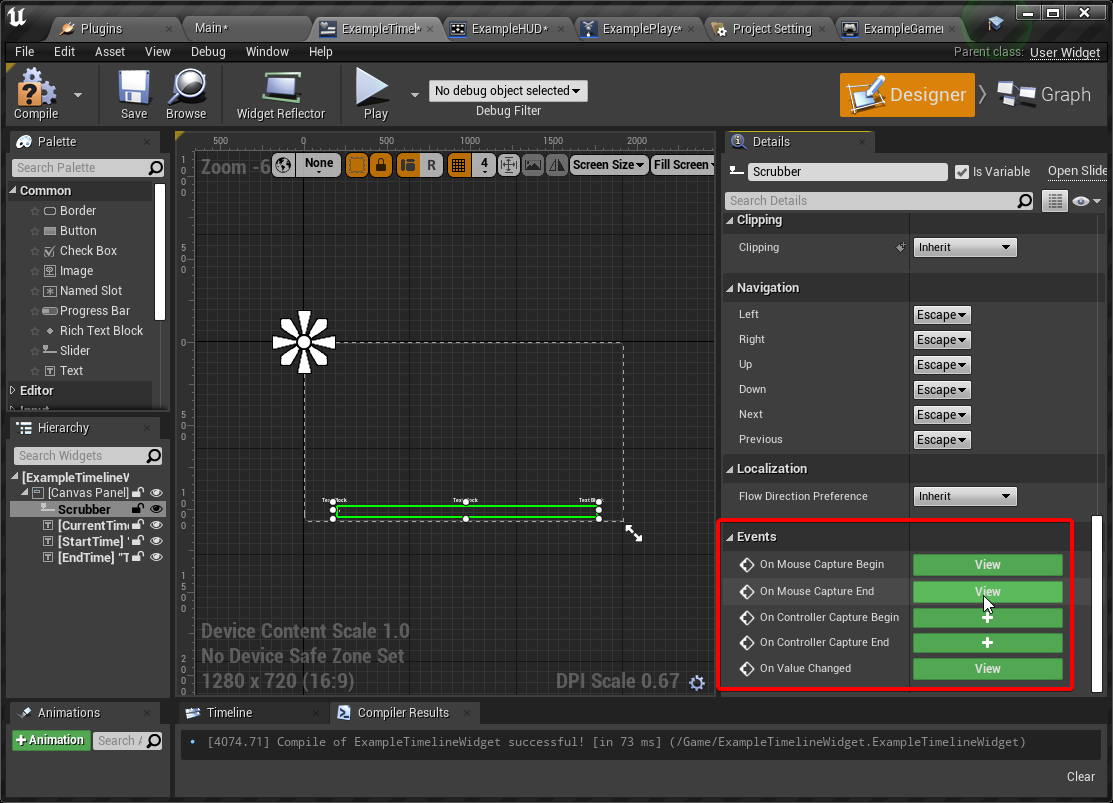
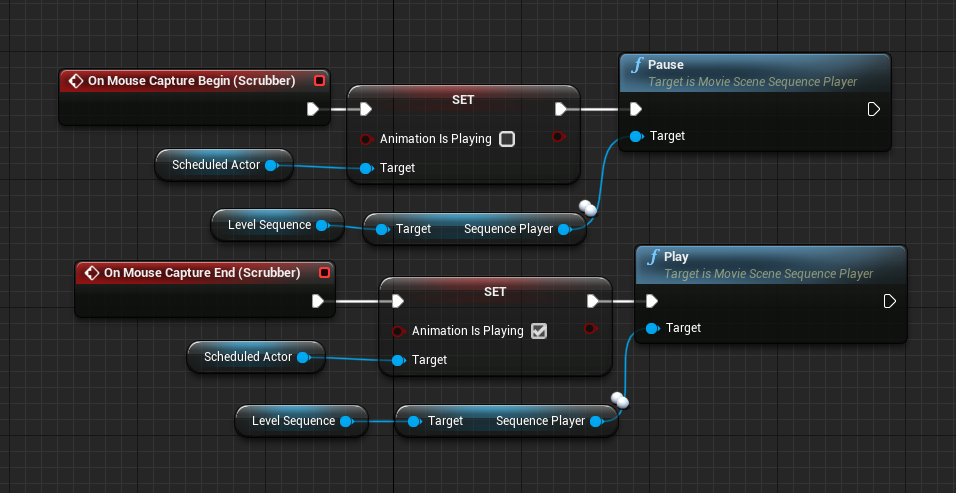
On mouse capture, pause the animation, so that the scene does not keep playing while a user is trying to scrub through it. In the On Mouse Capture Begin event,
set the ScheduleActor’s AnimationIsPlaying variable to false, and call the Pause function on the level sequence. In the On Mouse Capture End event, do the opposite,
setting AnimationIsPlaying to true, and calling the Play function on the level sequence.
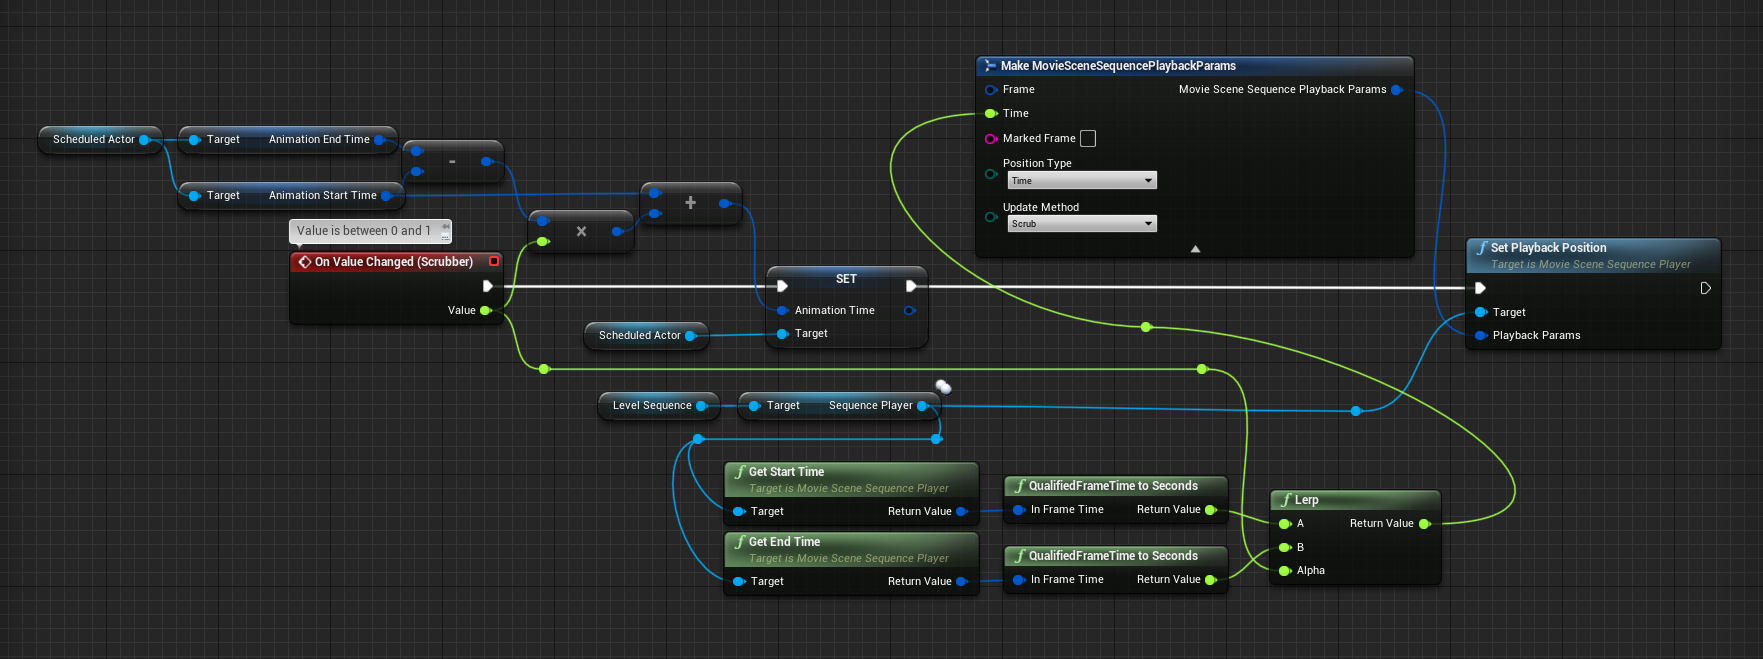
Finally, you must implement the On Value Changed event by converting the scrubber value from between 0 and 1 to the appropriate date in the schedule for setting the
ScheduleActor’s AnimationTime, and you must calculate the proportional time in the level sequence and call its SetPlaybackPosition function. The necessary math for
transforming from the value between 0 and 1 to the level sequence seconds and schedule date time can be seen in the following blueprint code.
Conclusion
With your scene scrubber now working, you should be able to start extending the code with your own inputs and controls, such as using custom interface control styles, or new inputs like pause buttons, etc. For a full list of available blueprint functions in the iTwin Unreal Datasmith Plugin, see the Blueprint API reference.
If you have an idea for something that could improve your workflow and belongs in the plugin, visit our ideas portal.

